 LicenseManager
You built a Mac app in SwiftUI, and you sell it from your own website instead of the Mac App Store, or as well as it. Apple won’t tell your app who paid. The usual answer is a license key: the customer pays on your site, receives a key by email, and pastes it into your app to unlock it.
Adding license keys to a Mac app means validating that key against a server you trust, tying it to a limited number of Macs, storing it in the Keychain, and keeping a signed proof of the last validation so the app works offline. This guide walks through each piece, in Swift: the package, the activation screen, locked states, gating paid features, machine limits, offline checks and distribution.
What a license check has to do
On every launch, your app answers a few questions:
- Is there a key? If not, show the activation screen.
- Is the key real? It must exist, not be made up.
- Is it still valid? Not expired, not refunded, not canceled.
- Is it used on too many Macs? A key bought for one person shouldn’t unlock a whole office.
- What if the Mac is offline? The app has to keep working on a plane.
Questions 2 to 4 need a source of truth the customer can’t edit: a server, or an activation licensing service. Question 5 means the app must remember the server’s last answer in a way that can’t be forged.
Many Mac developers start with an offline-only scheme: a key that’s a signature of the customer’s email, checked with a public key in the app. It needs no server, and it answers question 2 only. A key posted on a forum works on every Mac, forever, and a refund can’t revoke it.
Install the package
This guide uses licensemanager-swift, a Swift package that runs the whole check for you. In Xcode, choose File > Add Package Dependencies…, paste the URL, and add the LicenseManagerKit library to your app’s target:
https://github.com/licenseman/licensemanager-swiftIt needs macOS 13 or later and Swift 6, and has no dependencies beyond Apple’s frameworks.
Create one LicenseManager when your app starts, with your product’s id and your public key, both from the dashboard:
import LicenseManagerKit

let licenseManager: LicenseManager = {
    do {
        return try LicenseManager(
            productID: "x7Kp2QaZ",
            publicKey: """
            -----BEGIN PUBLIC KEY-----
            MCowBQYDK2VwAyEA…
            -----END PUBLIC KEY-----
            """
        )
    } catch {
        fatalError("LicenseManager: \(error.localizedDescription)")
    }
}()
Hard-code both in your source. A public key read from a file or fetched at runtime could be replaced by someone who wants to sign their own tokens. Point debug builds at a test product, with #if DEBUG, so test keys never unlock a release build.
In a sandboxed app, check Outgoing Connections (Client) under Signing & Capabilities > App Sandbox. Without it, every validation fails with a network error.
Show the right screen
LicenseObserver publishes the license state to your SwiftUI views. Create it once in your App, and switch on its state:
import LicenseManagerKit
import SwiftUI

@main
struct AcmePhotoApp: App {
    @StateObject private var license = LicenseObserver(manager: licenseManager)

    var body: some Scene {
        WindowGroup {
            Group {
                switch license.state {
                case .loading: ProgressView("Checking your license…")
                case .active: ContentView()
                case .missingKey: ActivationView()
                default: LockedView()
                }
            }
            .environmentObject(license)
        }
    }
}
With a stored key and a valid stored token, the state is .active right away, and the online validation runs in the background: launch is never delayed by the network.
Build the activation screen
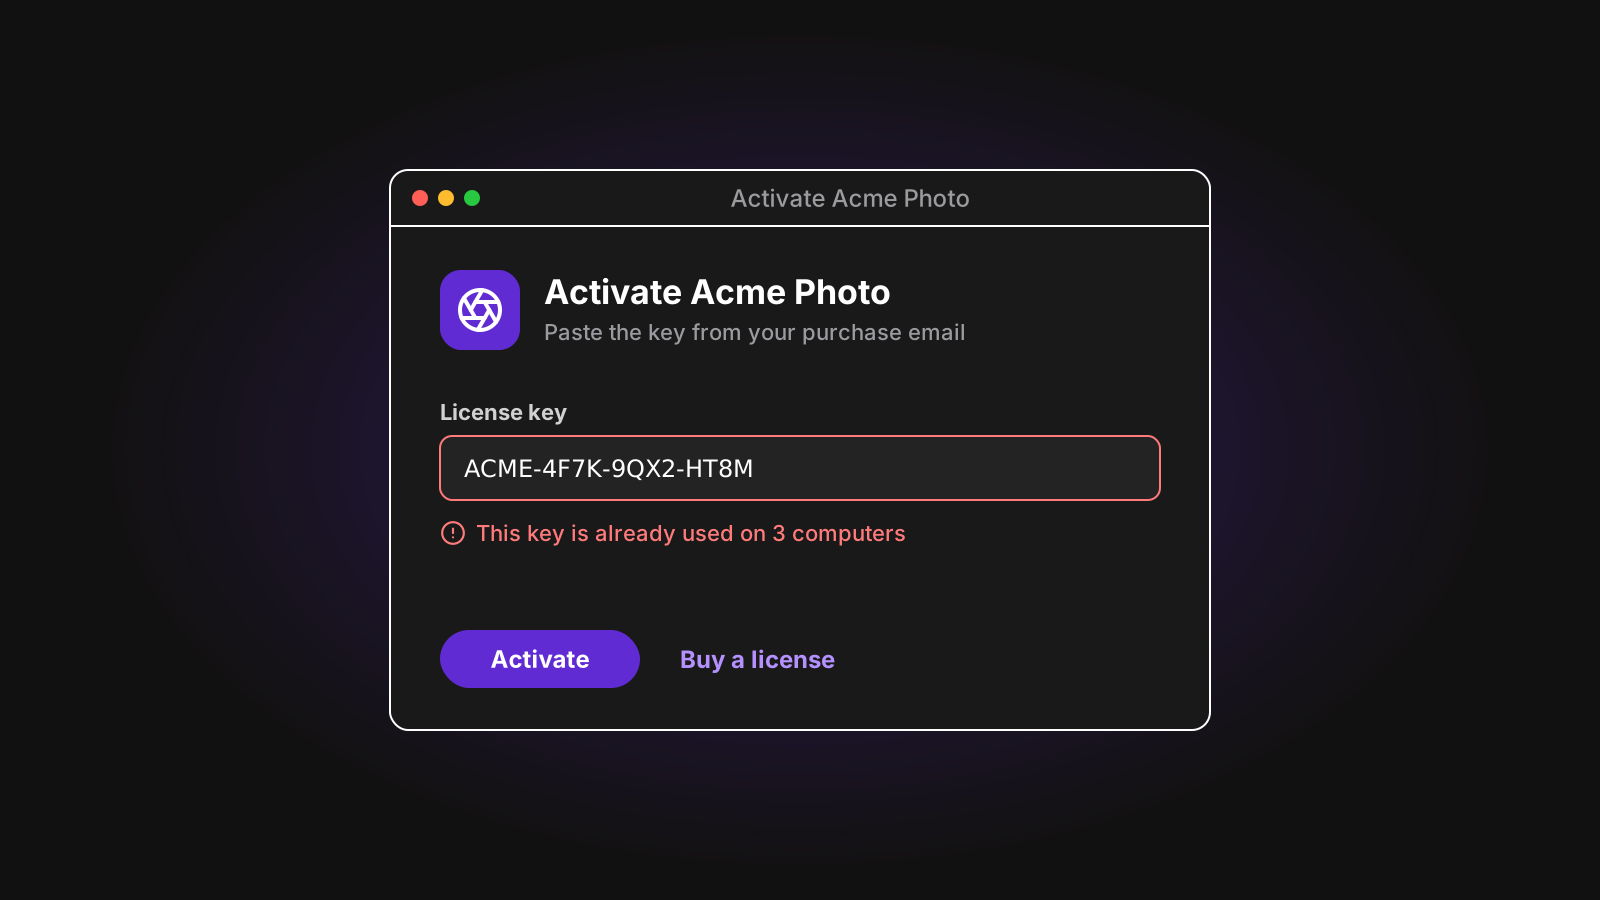
The activation screen is a text field and a button. The customer pastes the key from their purchase email.
import LicenseManagerKit
import SwiftUI

struct ActivationView: View {
    @EnvironmentObject private var license: LicenseObserver
    @State private var key = ""
    @State private var error: String?
    @State private var activating = false

    var body: some View {
        VStack(alignment: .leading, spacing: 12) {
            Text("Activate Acme Photo").font(.title2.bold())
            TextField("ACME-XXXX-XXXX-XXXX", text: $key)
            if let error { Text(error).foregroundStyle(.red) }
            HStack {
                Link("Buy a license", destination: URL(string: "https://acme.com/buy")!)
                Spacer()
                Button("Activate") { Task { await activate() } }
                    .disabled(activating || key.isEmpty)
                    .keyboardShortcut(.defaultAction)
            }
        }
        .padding(24)
        .frame(width: 420)
    }

    func activate() async {
        activating = true
        defer { activating = false }
        do {
            try await license.activate(key: key) // the state becomes .active
        } catch let error as LicenseError {
            self.error = message(for: error)
        } catch {
            self.error = "Activation failed. Try again in a few minutes."
        }
    }
}
The key is trimmed for you, so a trailing space copied from an email doesn’t fail. A failed activation changes nothing: a customer whose app already works and who types a wrong key keeps their license. Turn the error’s code into a message the customer can act on:
| Code | What to show |
|---|---|
.notFound | “This key wasn’t recognized. Copy it again from your purchase email.” |
.licenseExpired | “This license expired. Renew it to keep using Acme Photo.” |
.machineLimitReached | “This key is already used on 2 Macs. Deactivate one in your account.” |
.versionNotAllowed | “Your license includes Acme Photo up to 2.3.1.” |
.networkError | “Couldn’t reach the license server. Check your connection and try again.” |
Branch on error.code, never on the message text. The full list is in activating a license.
Handle the locked states
A key that worked last month can stop working: a subscription ended, a refund, a fifth Mac. Each reason deserves its own message and its own button:
.invalidKey: “This key wasn’t recognized”, with a link to find a lost key..expired: a renew button, and a “Try again” button that callsrefresh()once they renewed..machineLimitReached: “Manage my license”, which opens the customer portal where the customer frees an old Mac..versionNotAllowed: the license doesn’t include this version, for instance after its year of updates. Offer the latest version it allows, or an upgrade..offlineExpired: “Connect to the internet to check your license.”.clockTampered: “Your Mac’s date and time look wrong.”
LicenseObserver gives you refresh() and openPortal() for the buttons. And one rule above the others: a network error never locks the app. If the license server is unreachable for an hour, your customers don’t notice. Only an answer that says something about the license changes the state. See license states.
Gate paid features where they run
Your views decide what to show. What must stay locked, like exporting or saving, should check the license where it runs, not only by hiding a button:
func exportPDF(to url: URL) throws {
    guard licenseManager.state == .active else { throw AcmeError.licenseRequired }
    // …
}
state is synchronous and thread-safe, so read it each time instead of caching it: a license refused in the background locks the feature right away. For a feature that must not run before the startup validation, await licenseManager.ready() first.
No license check stops someone determined to patch your binary. The goal is to stop the common cases: a key shared past its machine limit, a forged token, a clock set back. See SwiftUI and AppKit.
Limit the number of Macs
To enforce “up to 2 Macs per license”, the app sends a fingerprint of the Mac with each validation, and the server counts the distinct fingerprints per license.
A good fingerprint is stable across restarts, updates and reinstalls, different on each Mac, and leaks nothing personal. The SDK builds it from the hashed hardware UUID (IOPlatformUUID, read with IOKit), plus a random install id kept in the Keychain, and your product id. Copying a hardware UUID to another Mac isn’t enough to reuse a place, and the same Mac gets the same fingerprint after a reinstall of your app. See machine fingerprint.
When a customer replaces their Mac, they free the old one themselves from the customer portal, and activate the new one. Put a Manage License… item in your app menu that calls license.openPortal().
Keep working offline
A license check that needs the internet locks out a customer on a train. The fix is a signed token: at each successful validation, the server answers with a small payload (the key, the fingerprint, an expiration), signed with a private key only the server has. The SDK stores it, and on each launch verifies its Ed25519 signature with CryptoKit and the public key compiled into your app. Without a connection, the app stays .active until the token expires.
You choose how long that is in the license’s policy, and the SDK renews the token in the background before it expires, even across sleep. To warn customers who’ve been offline too long, read the offline state:
struct OfflineBanner: View {
    @EnvironmentObject private var license: LicenseObserver

    var body: some View {
        if case .offline(let validUntil?, let remaining) = license.offlineState,
           remaining < 2 * 86_400 {
            Text("Connect to the internet before \(validUntil.formatted()) to keep using Acme Photo.")
        }
    }
}
The system clock is the weak spot of offline checks: set it back a year, and an expired token looks valid. The SDK remembers the latest time it saw, checks it against a server’s time when online, and moves to .clockTampered when the clock goes backwards. See working offline.
Store the key in the Keychain
UserDefaults is the wrong place for a license key: it’s a plist anyone can read and edit with defaults write. A file in Application Support isn’t much better.
The SDK stores the key and the token in the Keychain, as generic passwords readable by your app, and mirrors them in files in case the Keychain is unavailable. Both live outside your app bundle, so a customer who drags your app to the Trash and reinstalls it is still activated, on the same place of their license, and a trial can’t be restarted that way. Ad-hoc signed development builds skip the Keychain, so you don’t get a permission prompt on every run. See stored data.
Sign, notarize, and sell
The SDK needs no exception of the hardened runtime: sign your app with your Developer ID, notarize it, and ship it as a .dmg or with Sparkle for updates. Keep your bundle id and signing team stable, since the Keychain ties its items to your app’s signature.
Selling on the Mac App Store as well? Apple sells that copy, and its guidelines don’t let an App Store app ask for a key to unlock what you sell elsewhere: leave the activation screen out of the store build with a compile-time flag. See sandbox and distribution, and how to sell a Mac app outside the Mac App Store for the rest of the setup.
Create the keys when people pay
The last piece is outside your app: creating a key when someone pays, and emailing it. With Stripe, that’s a webhook on checkout.session.completed that creates the key, sends the email, and later handles refunds, renewals and failed payments.
Build it or use a service
Everything above is buildable: a server with a database of keys, a Stripe webhook, Ed25519 tokens and key rotation, a machine count, Keychain storage with a fallback, clock checks, and a page where customers free a Mac. Each piece is small. Together, they’re a few weeks of work, and a server every paying customer depends on.
LicenseManager does that part. Connect your Stripe or Paddle account, and each purchase creates a license key and emails it to the customer, with no backend of your own. The macOS SDK is the package used in this guide. Customers find their key and free old Macs in the portal, and trial licenses use the same code as paid ones. Moving from an Electron or Tauri version of your app? The Swift package reads what they stored, with the same fingerprint, so customers stay activated: see migrating.
Wrapping up
Adding license keys to a Mac app takes a package created with your public key, an activation screen, a message for each locked state, paid features that check the state where they run, a fingerprint for the machine limit, and a signed token in the Keychain for offline use.
The setup guide gets you from adding the package to a working activation screen. Building with Tauri instead? See how to add license keys to a Tauri app.